Con questo articolo imparerai come creare una criptovaluta con Ethereum. I token nell’ecosistema ethereum possono rappresentare qualsiasi bene negoziabile: monete, punti fedeltà, premi per i giochi etc. Dato che ogni token presenta delle funzioni simili, i tuoi token potranno essere istantaneamente compatibili con i wallet ethereum e ogni altro client che usa gli stessi standard.
Un token base si presenta cosi:
pragma solidity ^0.4.20;

contract MyToken {

/* This creates an array with all balances */

mapping (address = uint256) public balanceOf;


/* Initializes contract with initial supply tokens to the creator of the contract */

function MyToken(

uint256 initialSupply

) public {

balanceOf[msg.sender] = initialSupply;              // Give the creator all initial tokens

}


/* Send coins */

function transfer(address _to, uint256 _value) public {

require(balanceOf[msg.sender] = _value);           // Check if the sender has enough

require(balanceOf[_to] + _value= balanceOf[_to]); // Check for overflows

balanceOf[msg.sender] -= _value;                    // Subtract from the sender

balanceOf[_to] += _value;                           // Add the same to the recipient

}

}
Ma se vuoi copiare e incollare un codice più completo allora usa questo:
pragma solidity ^0.4.16;

interface tokenRecipient { function receiveApproval(address _from, uint256 _value, address _token, bytes _extraData) external; }

contract TokenERC20 {

// Public variables of the token

string public name;

string public symbol;

uint8 public decimals = 18;

// 18 decimals is the strongly suggested default, avoid changing it

uint256 public totalSupply;

// This creates an array with all balances

mapping (address = uint256) public balanceOf;

mapping (address = mapping (address = uint256)) public allowance;


// This generates a public event on the blockchain that will notify clients

event Transfer(address indexed from, address indexed to, uint256 value);


// This notifies clients about the amount burnt

event Burn(address indexed from, uint256 value);


/**

* Constructor function

*

* Initializes contract with initial supply tokens to the creator of the contract

*/

function TokenERC20(

uint256 initialSupply,

string tokenName,

string tokenSymbol

) public {

totalSupply = initialSupply * 10 ** uint256(decimals);  // Update total supply with the decimal amount

balanceOf[msg.sender] = totalSupply;                // Give the creator all initial tokens

name = tokenName;                                   // Set the name for display purposes

symbol = tokenSymbol;                               // Set the symbol for display purposes

}


/**

* Internal transfer, only can be called by this contract

*/

function _transfer(address _from, address _to, uint _value) internal {

// Prevent transfer to 0x0 address. Use burn() instead

require(_to != 0x0);

// Check if the sender has enough

require(balanceOf[_from] = _value);

// Check for overflows

require(balanceOf[_to] + _value = balanceOf[_to]);

// Save this for an assertion in the future

uint previousBalances = balanceOf[_from] + balanceOf[_to];

// Subtract from the sender

balanceOf[_from] -= _value;

// Add the same to the recipient

balanceOf[_to] += _value;

emit Transfer(_from, _to, _value);

// Asserts are used to use static analysis to find bugs in your code. They should never fail

assert(balanceOf[_from] + balanceOf[_to] == previousBalances);

}


/**

* Transfer tokens

*

* Send `_value` tokens to `_to` from your account

*

* @param _to The address of the recipient

* @param _value the amount to send

*/

function transfer(address _to, uint256 _value) public {

_transfer(msg.sender, _to, _value);

}


/**

* Transfer tokens from other address

*

* Send `_value` tokens to `_to` on behalf of `_from`

*

* @param _from The address of the sender

* @param _to The address of the recipient

* @param _value the amount to send

*/

function transferFrom(address _from, address _to, uint256 _value) public returns (bool success) {

require(_value <= allowance[_from][msg.sender]);     // Check allowance

allowance[_from][msg.sender] -= _value;

_transfer(_from, _to, _value);

return true;

}


/**

* Set allowance for other address

*

* Allows `_spender` to spend no more than `_value` tokens on your behalf

*

* @param _spender The address authorized to spend

* @param _value the max amount they can spend

*/

function approve(address _spender, uint256 _value) public

returns (bool success) {

allowance[msg.sender][_spender] = _value;

return true;

}


/**

* Set allowance for other address and notify

*

* Allows `_spender` to spend no more than `_value` tokens on your behalf, and then ping the contract about it

*

* @param _spender The address authorized to spend

* @param _value the max amount they can spend

* @param _extraData some extra information to send to the approved contract

*/

function approveAndCall(address _spender, uint256 _value, bytes _extraData)

public

returns (bool success) {

tokenRecipient spender = tokenRecipient(_spender);

if (approve(_spender, _value)) {

spender.receiveApproval(msg.sender, _value, this, _extraData);

return true;

}

}


/**

* Destroy tokens

*

* Remove `_value` tokens from the system irreversibly

*

* @param _value the amount of money to burn

*/

function burn(uint256 _value) public returns (bool success) {

require(balanceOf[msg.sender] = _value);   // Check if the sender has enough

balanceOf[msg.sender] -= _value;            // Subtract from the sender

totalSupply -= _value;                      // Updates totalSupply

emit Burn(msg.sender, _value);

return true;

}


/**

* Destroy tokens from other account

*

* Remove `_value` tokens from the system irreversibly on behalf of `_from`.

*

* @param _from the address of the sender

* @param _value the amount of money to burn

*/

function burnFrom(address _from, uint256 _value) public returns (bool success) {

require(balanceOf[_from] = _value);                // Check if the targeted balance is enough

require(_value= allowance[_from][msg.sender]);    // Check allowance

balanceOf[_from] -= _value;                         // Subtract from the targeted balance

allowance[_from][msg.sender] -= _value;             // Subtract from the sender's allowance

totalSupply -= _value;                              // Update totalSupply

emit Burn(_from, _value);

return true;

}

}
Come capire il codice

Il modo migliore per capire come creare una criptovaluta su ethereum è iniziare dalle basi. Apri l’app del wallet, vai alla sezione contracts e poi su deploy new contract. Sul campo di testo del solidity contract source code scrivi questo:
contract MyToken {

/* This creates an array with all balances */

mapping (address = uint256) public balanceOf;

}
Un mapping è un array associativo, dove tu associ gli indirizzi con i bilanci. Gli indirizzi sono nel formato base ethereum esadecimale, mentre i bilanci sono numeri interi, che vanno da 0 a 115 quattuorvigintillione. Se non sai quant’è un quattuorvigintillione, sono tanti vigintillioni più di qualsiasi numero a cui avresti pensato di raggiungere con i tuoi token. Public keyword, significa che questa variabile sarà accessibile da chiunque nella blockchain, ossia che tutti i bilanci sono pubblici.
Leggi anche: Solidity: la guida definitiva
(come devono essere per essere mostrati ai clienti).
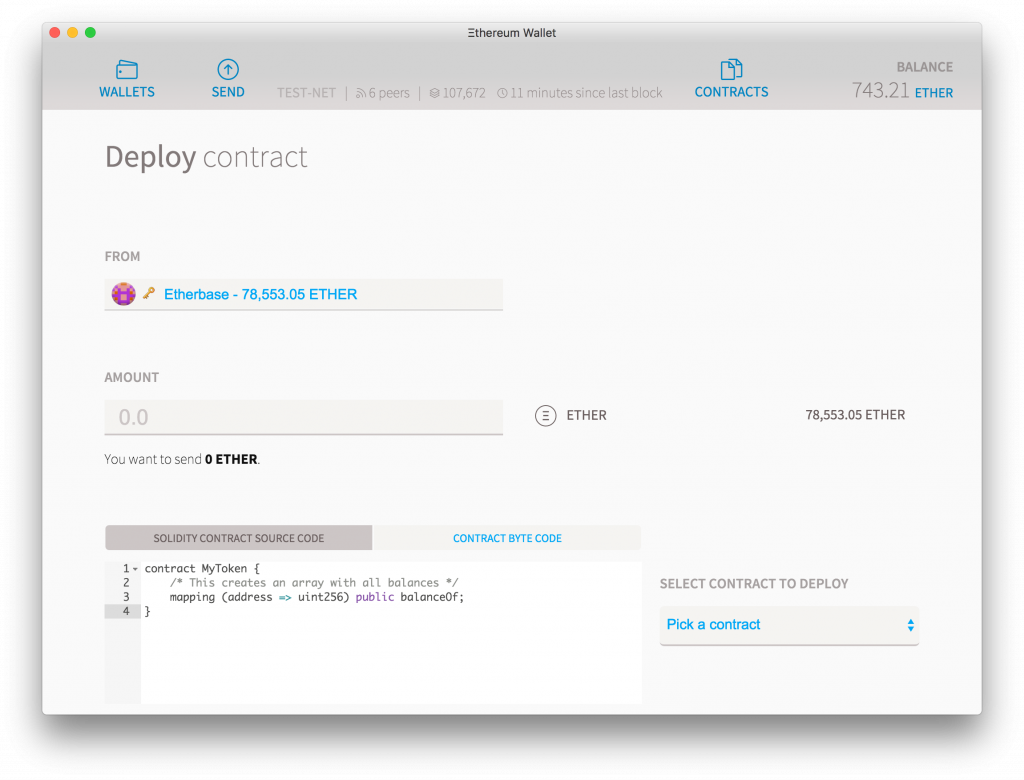
Se hai appena pubblicato il contratto, potrebbe benissimo funzionare, ma non sarebbe molto utile: sarebbe un contratto che potrebbe chiedere il bilancio del tuo coin per qualsiasi indirizzo, ma dato che non hai ancora creato alcun token, ognuno tornerebbe come 0. Quindi inizieremo con il creare un po di token.
Aggiungi questo codice prima dell’ultima parentesi, sotto la linea mapping.
function MyToken() {

balanceOf[msg.sender] = 21000000;

}
Da notare che function mytoken deve avere lo stesso nome di contract mytoken. Questo è molto importante, e se ne rinomini uno, allora devi rinominare anche gli altri: questa è una funzione iniziale che si avvia solo quando il contratto viene caricato la prima volta sul token. Questa funzione imposterà il bilancio di msg.sender, l’utente che ha creato il contratto, con un bilancio di 21 milioni.
La scelta di 21 milioni è arbitraria e puoi cambiare qualsiasi cosa nel codice, ma c’è un modo migliore: il bilancio diventa un parametro per la funzione, in questo modo:
function MyToken(uint256 initialSupply) public {

balanceOf[msg.sender] = initialSupply;

}
Guarda alla colonna di destra vicino al contratto e vedrai una lista a cascata, chiamata pick a contract. Seleziona il contratto “mytoken” e vedrai che mostrerà una sezione che si chiama Constructor parameters. Questi sono parametri modificabili per il tuo token, cosi puoi riusare lo stesso codice e cambiare solo queste variabili.
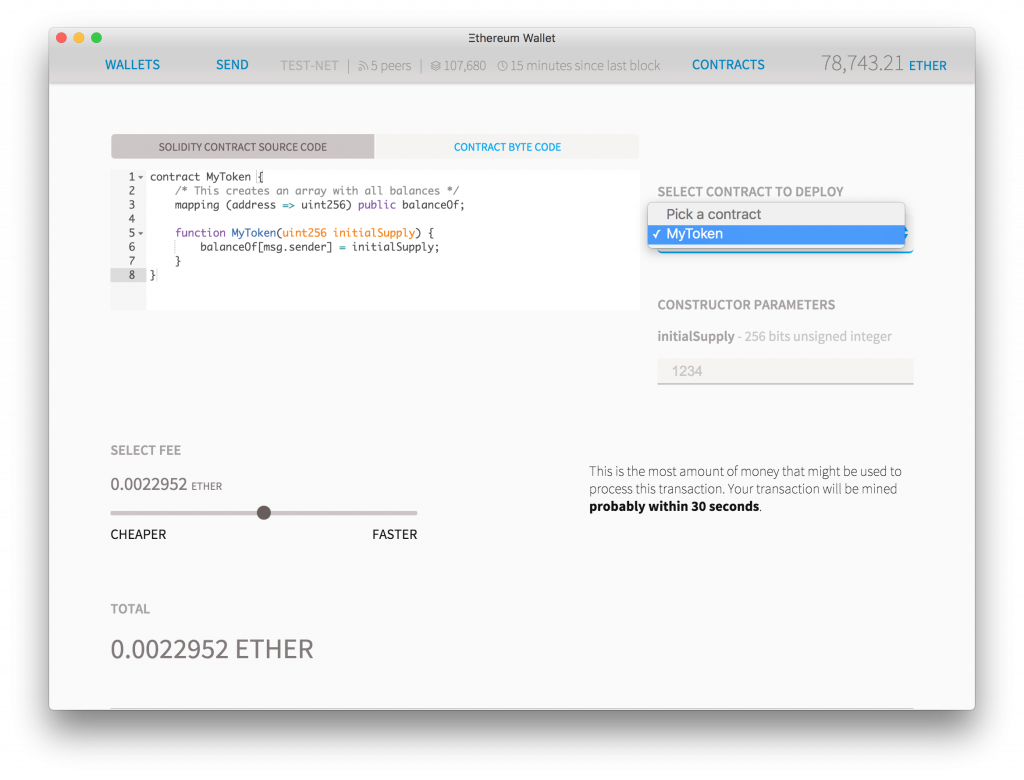
Al momento abbiamo un contratto funzionante che ha creato bilanci di token, ma dato che non c’è una funzione per muoverlo, rimane sempre nello stesso account. Quindi andremo ad implementarla adesso questa funzione. Scrivi il codice seguente prima dell’ultima parentesi.
/* Send coins */

function transfer(address _to, uint256 _value) {

/* Add and subtract new balances */

balanceOf[msg.sender] -= _value;

balanceOf[_to] += _value;

}
Questa è una funzione molto diretta: ha un recipiente e un valore come parametro e ogni volta che viene chiamata, si sottrarrà il valore dal bilancio e si aggiungerà al suo bilancio. Al momento però c’è un problema ovvio, che succede se una persona vuole mandare più token di quelli che ha?
Dato che non vogliamo occuparci dei debiti in questo particolare contratto si può fare un controllo veloce e vedere se l’utente che invia i token non ha abbastanza fondi e poi far finire l’esecuzione del contratto. E anche se vogliamo controllare il sovrannumero, per evitare di avere un numero cosi grande che diventi 0.
Per fermare un contratto in esecuzione puoi fare return o throw. Il primo costa meno token ma potrebbe dare problemi perché ogni cambiamento che hai fatto rimarrà li. D’altra parte la funzione throw cancellerà l’esecuzione del contratto, e cancellerà ogni cambiamento che la transazione ha fatto e l’inviante perderà tutti gli ether che ha inviato. Ma dato che un wallet può individuare che un un contratto è stato fermato, lo fermerà prevenendo la perdita degli ether.
function transfer(address _to, uint256 _value) {

/* Check if sender has balance and for overflows */

require(balanceOf[msg.sender] >= _value && balanceOf[_to] + _value >= balanceOf[_to]);


/* Add and subtract new balances */

balanceOf[msg.sender] -= _value;

balanceOf[_to] += _value;

}
Adesso quello che ci manca sono delle informazioni basiche sul contratto. In futuro potranno essere fatti da un registro di token, ma per adesso li aggiungeremo direttamente al contratto:
string public name;

string public symbol;

uint8 public decimals;
E adesso aggiorneremo la constructor function per permettere a tutte quelle variabili di funzionare
/* Initializes contract with initial supply tokens to the creator of the contract */

function MyToken(uint256 initialSupply, string tokenName, string tokenSymbol, uint8 decimalUnits) {

balanceOf[msg.sender] = initialSupply;              // Give the creator all initial tokens

name = tokenName;                                   // Set the name for display purposes

symbol = tokenSymbol;                               // Set the symbol for display purposes

decimals = decimalUnits;                            // Amount of decimals for display purposes

}
Per finire, abbiamo bisogno di qualcosa chiamato events. Queste sono funzioni speciali che puoi usare per aiutare i clienti, come il wallet di ethereum che tiene traccia delle attività che succedono nel contratto. Gli eventi dovrebbero iniziare con una lettera maiuscola. Aggiungi questa linea all’inizio del contratto per fare un event:
event Transfer(address indexed from, address indexed to, uint256 value);
E poi devi aggiungere queste due linee nella funzione transfer
/* Notify anyone listening that this transfer took place */

Transfer(msg.sender, _to, _value);
E adesso il tuo token è pronto
Hai notato i commenti?
Cosa sono quei commenti @notice e @param potresti chiedere, quello è Natspec uno standard emergente per una specificazione naturale del linguaggio, che permette ai wallet di mostrare all’utente una descrizione di cosa il contratto sta per fare. Anche se non è supportato da molti wallet, questo cambierà in futuro, quindi è meglio essere preparati
Come avviare
Se non lo hai già fatto, apri il wallet di ethereum, vai alla sezione contracts e poi clicca deploy new contract.
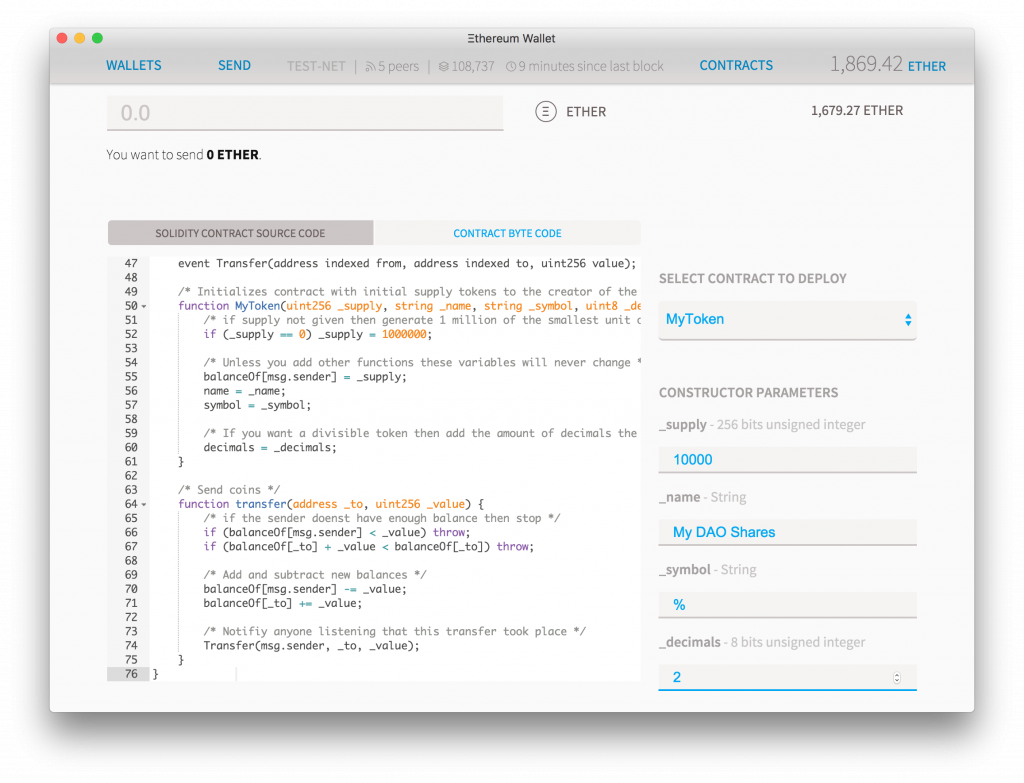
Adesso prendi il token sorgente da sopra e incollalo nel campo Solidity source. Se il codice si compila senza errori, potrai vedere pick a contract sulla destra. Cliccaci e seleziona il contratto mytoken. Sulla colonna di destra vedrai tutti i parametri che ti servono per personalizzare il tuo token. Puoi modificarli come vuoi ma per questo tutorial ti raccomando di mettere questi parametri 10000 come supply, un nome qualsiasi, % come simbolo e 2 decimal places. La tua app dovrebbe essere cosi:
Scrolla alla fine della pagina e vedrai una stima del costo di computazione del contratto e puoi selezionare quanti ether vorresti pagare per appunto, la computazione. Ogni ether che non spendi ti ritornerà, quindi puoi lasciare le impostazioni di default. Clcca deploy, inserisci account e password e aspetta qualche secondo che la tua transazione si avvii.
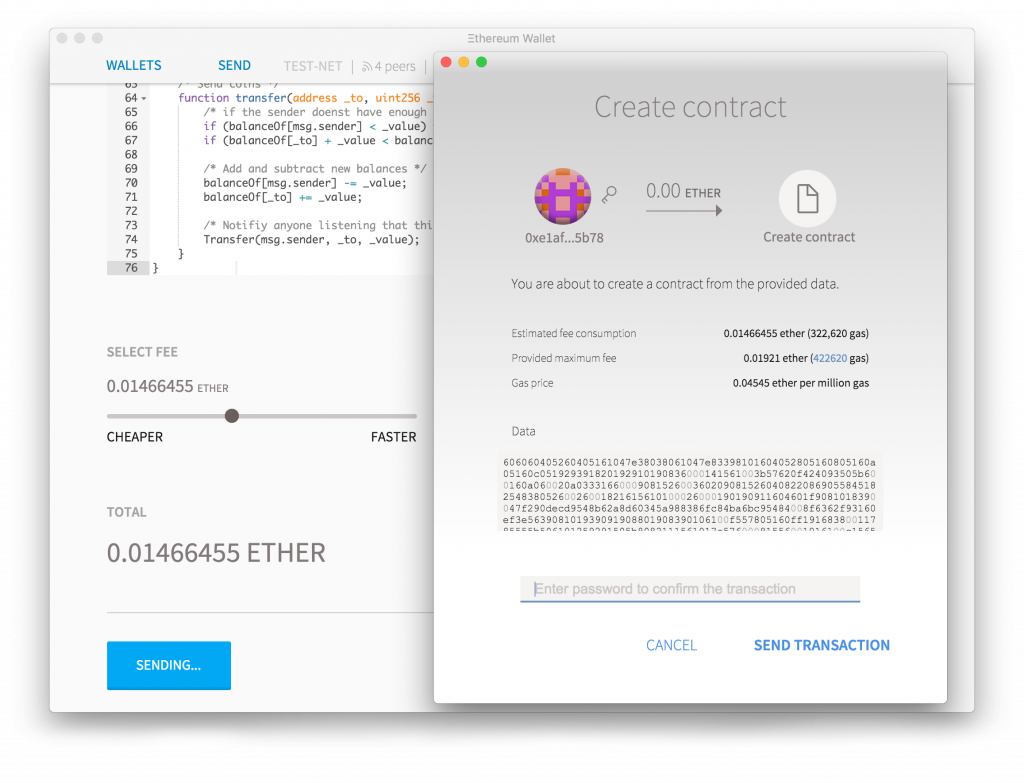
Sarai ridirezionato alla pagina iniziale dove potrai vedere la tua transazione che aspetta la conferma. Clicca l’account chiamato etherbase, il tuo account principale, e dopo poco meno di un minuto potrai vedere che il tuo account mostrerà che hai il 100% delle quote che hai creato. Per inviarne un pò ai tuoi amici: seleziona send, poi scegli quanti token vuoi inviare, incolla l’indirizzo dei tuoi amici nel campo to e clicca send.
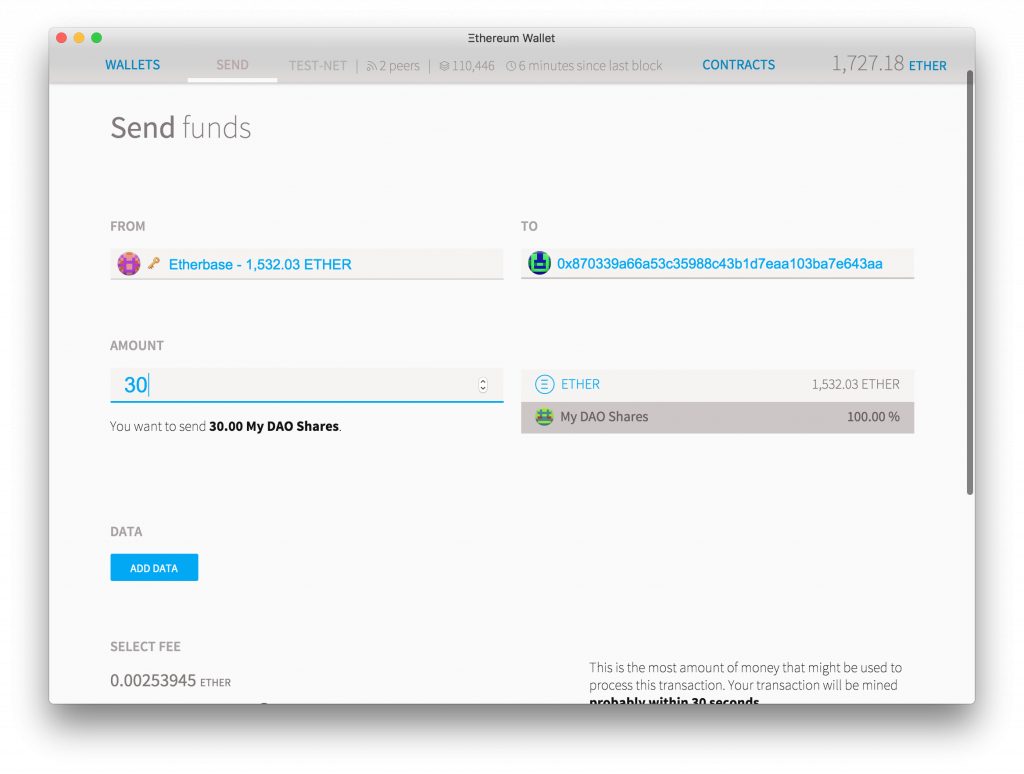
Se li invii ai tuoi amici, non vedranno ancora niente nei loro wallet. Questo perché il wallet traccia solo i token che conosce e dovrai aggiungerli manualmente. Adesso vai alla sezione contracts, dovresti vedere un link al tuo nuovo contratto. Cliccaci e vai sulla sua pagina. Dato che questa è una pagina di contratto molto semplice, non c’è molto da fare, clicca copy address e incollalo nell’editor di testo, ti servirà a breve.
Per aggiungere un token da controllare vai alla sezione contracts e clicca watch token. Apparirà un popup e li dovrai incollare l’indirizzo copiato. I campi, Il nome del token, il simbolo e il decimale, saranno già riempiti, ma se non lo sono puoi metterci quel che vuoi. Una volta fatto ti mostrerà automaticamente il bilancio di quel token e potrai inviarlo.
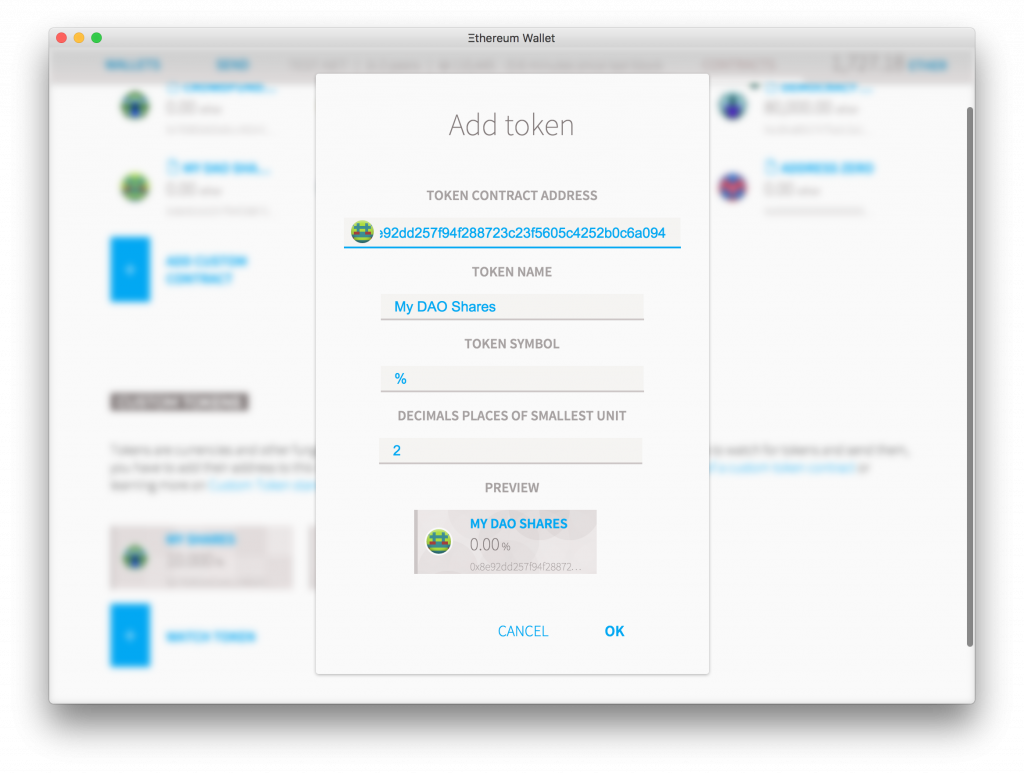
E adesso hai il tuo crypto token, i token da soli possono essere utili come valuta di scambio, come modi per tener conto delle ore lavorative o altro. Ma possiamo far si che una valuta abbia un valore intrinseco per renderla utile.
Miglioriamo il token
Puoi far partire il tuo token senza toccare nemmeno una linea di codice, ma la magia inizia quando inizi a personalizzarlo. Le seguenti sessioni saranno suggerimenti e funzioni che puoi aggiungere al tuo token per farlo diventare migliore
Altre funzioni base
Avrai notato che ci sono più funzioni nel contratto del token. Come approve, sendfrom e altre. Queste funzioni sono li per far si che il token interagisca con altri contratti: quindi se vuoi, diciamo, vendere i token ad un exchange decentralizzato, inviarli al loro indirizzo non è abbastanza perché loro non sapranno chi li ha inviati ne conosceranno il nuovo token, perche i contratti non sono in grado di aderire ad un event solo con le function calls. Quindi devi prima approvare la quantità di token per i contratti cosi che possano muovere dal tuo account e poi fargli sapere che dovrebbero fare la loro cosa, o fare le 2 azioni in uno con approveandcall.
Dato che molte di queste funzioni devono ri-implementare il trasferimento di token, ha senso cambiarle in una funzione interna, che può essere usata solo dal contratto stesso.
/* Internal transfer, can only be called by this contract */

function _transfer(address _from, address _to, uint _value) internal {

require (_to != 0x0);                               // Prevent transfer to 0x0 address. Use burn() instead

require (balanceOf[_from] >= _value);                // Check if the sender has enough

require (balanceOf[_to] + _value >= balanceOf[_to]); // Check for overflows

require(!frozenAccount[_from]);                     // Check if sender is frozen

require(!frozenAccount[_to]);                       // Check if recipient is frozen

balanceOf[_from] -= _value;                         // Subtract from the sender

balanceOf[_to] += _value;                           // Add the same to the recipient

Transfer(_from, _to, _value);

}
Adesso tutte le tue funzioni che risultano nel trasferimento di coin, possono fare i loro controlli, fare trasferimenti con i parametri corretti. C’è da notare che questa funzione muove i coin da un account ad un altro, senza il permesso di nessuno per farlo: è per questo che è una funzione interna, usata solo dal contratto: se aggiungi altre funzioni, devi assicurarti che chi le va ad usare abbia il permesso.
Centralized Administrator
Tutte le app sono decentralizzate di base, ma questo non significa che non possono avere una sorta di manager centrale se vuoi. Forse vuoi l’abilità di minare più coin o vuoi bannare delle persone. Puoi aggiungere queste funzioni, ma le puoi aggiungere solo all’inizio, cosi tutti quelli che hanno i token sapranno esattamente le regole del gioco prima che decidano di averne uno.
Per far succedere questo, c’è bisogno di un controllo centrale della valuta. Questo può essere un semplice account, ma può anche essere un contratto e quindi la decisione di creare più token dipenderà dal contratto, se si tratta di un’organizzazione democratica in cui si vota, o un modo per limitare il potere del possessore dei token.
Per farlo useremo delle utility dei contratti: inheritance. L’inheritance permette ad un contratto di prendere proprietà da un’altro senza modificarli entrambi. Questo rende il codice più semplice e più facile da riusare. Aggiungi questo codice alla prima linea del tuo codice, prima di contract my token{.
contract owned {

address public owner;


function owned() {

owner = msg.sender;

}


modifier onlyOwner {

require(msg.sender == owner);

_;

}


function transferOwnership(address newOwner) onlyOwner {

owner = newOwner;

}

}
Questo crea la base del contratto che non fa altro se non definire alcune funzioni generiche sul contratto che può essere posseduto. Adesso il prossimo passo è aggiungere la parte is owned al tuo contratto.
contract MyToken is owned {

/* the rest of the contract as usual */
Questo significa che tutte le funzioni dentro mytoken adesso possono accedere alle variabili ownler e il modificatore onlyowner. Il contratto ottiene anche una funzione di trasferimento, cosi che il possesso del contratto possa essere dato a qualcun altro. Dato che potrebbe essere interessante impostare il possessore del contratto all’inizio, puoi aggiungere questo codice al constuctor function.
function MyToken(

uint256 initialSupply,

string tokenName,

uint8 decimalUnits,

string tokenSymbol,

address centralMinter

) {

if(centralMinter != 0 ) owner = centralMinter;

}
Central Mint
Mettiamo che tu voglia cambiare la quantità di token che circolano. In questo caso i tuoi token rappresentano un asset della blockchain. Questo potrebbe servire anche quando i detentori della valuta si aspettano un certo controllo del prezzo del token e vogliono emettere o rimuovere i token dalla circolazione.
Per prima cosa si deve aggiungere una variabile per totalsupply e assegnarla al nostro constructor function
contract MyToken {

uint256 public totalSupply;


function MyToken(...) {

totalSupply = initialSupply;

...

}

...

}

Now let's add a new function finally that will enable the owner to create new tokens:

function mintToken(address target, uint256 mintedAmount) onlyOwner {

balanceOf[target] += mintedAmount;

totalSupply += mintedAmount;

Transfer(0, owner, mintedAmount);

Transfer(owner, target, mintedAmount);

}
Si può notare la modifica onlyowner alla fine del nome della funzione. Questo significa che questa funzione verrà riscritta alla compilazione per ottenere il codice dal modificatore onlyowner che abbiamo definito prima. Aggiungi questo contratto con un modificatore owner e sarai in grado di creare altri coin.
Congelamento degli asset
A seconda del tuo caso, potresti aver bisogno di avere delle regolazioni su chi può usare il token e chi no. Per farlo succedere devi aggiungere un parametro che permette al possessore del contratto di congelare o scongelare un asset.
Aggiungi questa variabile in qualsiasi parte nel contratto. Puoi metterla dove vuoi ma ti raccomando di mettere i mapping con altri mapping e gli events con altri events.
mapping (address = bool) public frozenAccount;

event FrozenFunds(address target, bool frozen);


function freezeAccount(address target, bool freeze) onlyOwner {

frozenAccount[target] = freeze;

FrozenFunds(target, freeze);

}
Con questo codice, tutti gli account sono scongelati di default ma il possessore può decidere che qualcuno venga congelato con il calling freeze account. Sfortunatamente il congelamento non ha effetto pratico perché non abbiamo aggiunto niente alla funzione di trasferimento. La cambieremo ora.
function transfer(address _to, uint256 _value) {

require(!frozenAccount[msg.sender]);
Adesso ogni account congelato avrà i suoi fondi intatti, ma non potrà muoverli. Tutti gli account sono scongelati di default finche tu non li congeli. Ma puoi facilmente cambiare la cosa e creare una whitelist in cui devi approvare manualmente ogni account. Rinomina semplicemente frozenaccount in approvedaccount e cambia l’ultima linea con.
require(approvedAccount[msg.sender]);
Vendita e acquisti automatici
Quindi per ora hai fatto affidamento sull’utilità e la fiducia per dare valore al tuo token. Ma se vuoi puoi far si che il valore del token sia sostenuto da ether, o altri token creando un fondo che vende e compra automaticamente al valore di mercato.
Per prima cosa impostiamo il prezzo per la vendita e l’acquisto:
uint256 public sellPrice;

uint256 public buyPrice;


function setPrices(uint256 newSellPrice, uint256 newBuyPrice) onlyOwner {

sellPrice = newSellPrice;

buyPrice = newBuyPrice;

}
Questo è accettabile per un prezzo che non cambia molto spesso, dato che ogni nuovo cambio di prezzo richiederà che tu faccia una transazione e spenda un po di ether.
Il prossimo passo è fare le funzioni di vendita e acquisto
function buy() payable returns (uint amount){

amount = msg.value / buyPrice;                    // calculates the amount

require(balanceOf[this]= amount);               // checks if it has enough to sell

balanceOf[msg.sender] += amount;                  // adds the amount to buyer's balance

balanceOf[this] -= amount;                        // subtracts amount from seller's balance

Transfer(this, msg.sender, amount);               // execute an event reflecting the change

return amount;                                    // ends function and returns

}


function sell(uint amount) returns (uint revenue){

require(balanceOf[msg.sender] = amount);         // checks if the sender has enough to sell

balanceOf[this] += amount;                        // adds the amount to owner's balance

balanceOf[msg.sender] -= amount;                  // subtracts the amount from seller's balance

revenue = amount * sellPrice;

msg.sender.transfer(revenue);                     // sends ether to the seller: it's important to do this last to prevent recursion attacks

Transfer(msg.sender, this, amount);               // executes an event reflecting on the change

return revenue;                                   // ends function and returns

}
Come potrai notare questo non crea nuovi token ma cambia il bilancio che il contratto ha. Il contratto può tenere sia gli ether che i tuoi token e il possessore del contratto, può impostare i prezzi o in alcuni casi creare nuovi token (se possibile) ma non può toccare i token della banca o gli ether. L’unico modo per questo contratto di muovere fondi è venderli o acquistarli.
I prezzi di vendita e acquisto non sono impostati in ether, ma in wei la valuta minima del sistema (equivalente al centesimo per l’euro, o al satoshi per i bitcoin). Un ether è 1 1000000000000000000 wei. Quindi quando devi impostare i prezzi per i tuoi token in ether, devi aggiungere 18 zeri.
Quando crei il contratto, inviagli abbastanza ether cosi che possa comprare tutti i token sul mercato, altrimenti il contratto sarà insolvente e gli utenti non potranno vendere i loro token.
I precedenti esempi, naturalmente descrivono un contratto con un singolo compratore e venditore centrale, un contratto più complesso permette un mercato dove chiunque può fare prezzi differenti, o carica i prezzi direttamente da una fonte esterna.
Autorefill
Ogni volta che fai una transazione su ethereum devi pagare una tassa al miner del blocco che calcolerà i risultati del tuo smart contract. Anche se questo potrebbe cambiare in futuro, al momento le tasse possono essere pagate solo in ether quindi tutti i tuoi utenti ne hanno bisogno. I token negli account con un bilancio inferiore della tassa sono bloccati finche il possessore non può pagare la tassa necessaria. Ma in alcuni casi, potresti non volere che i tuoi utenti debbano pensare agli ethereum, la blockchain, o come otttenere ether, quindi un possibile approccio sarebbe far si che i tuoi coin riempiano il bilancio degli utenti appena individuano che il bilancio è troppo basso.
Per farlo, per prima cosa devi creare una variabile con la quantità della soglia e una funzione per cambiarla. Se non conosci il valore, impostalo a 5 finney (0.005 ether).
uint public minBalanceForAccounts;
function setMinBalance(uint minimumBalanceInFinney) onlyOwner {
minBalanceForAccounts = minimumBalanceInFinney * 1 finney;
}</pre>
Poi aggiungi questa linea alla funzione transfer cosi che chi invia venga rimborsato:
[php]/* Send coins */
function transfer(address _to, uint256 _value) {
...
if(msg.sender.balance &lt; minBalanceForAccounts)
sell((minBalanceForAccounts - msg.sender.balance) / sellPrice);
}
Puoi anche cambiarla cosi che la tassa sia pagata in anticipo al ricevitore dall’inviatore:
/* Send coins */
function transfer(address _to, uint256 _value) {
...
if(_to.balance&lt;minBalanceForAccounts)
_to.send(sell((minBalanceForAccounts - _to.balance) / sellPrice));
}
Questo assicurerà che nessun account che riceve i token ha meno ether del necessario per pagare la tassa
Proof of Work
Ci sono alcuni modi di legare la fornitura dei tuoi coin ad una formula matematica. Uno dei modi più facili sarebbe fare un mining unito con ether, cioè ognuno che trova un blocco di ethereum riceve anche un tuo token. Puoi farlo usando la keyword special coinbase che si riferisce al miner che trova il blocco.
function giveBlockReward() {

balanceOf[block.coinbase] += 1;

}
E’ anche possibile aggiungere una formula matematica, cosi che chiunque riesce a risolvere la formula, vince una ricompensa. Su questo esempio devi calcolare la radice cubica della sfida della corrente, prendere un punto e il diritto di impostare la prossima sfida.
uint public currentChallenge = 1; // Can you figure out the cubic root of this number?

function rewardMathGeniuses(uint answerToCurrentReward, uint nextChallenge) {

require(answerToCurrentReward**3 == currentChallenge); // If answer is wrong do not continue

balanceOf[msg.sender] += 1;         // Reward the player

currentChallenge = nextChallenge;   // Set the next challenge

}
Naturalmente calcolare una radice cubica è difficile da fare a mente, ma è molto facile farlo con un calcolatore, e quindi questo gioco potrebbe essere vinto facilmente da un computer. Inoltre dato che l’ultimo vincitore deve scegliere la prossima sfida, possono scegliere qualcosa che conoscono e quindi non sarebbe un gioco alla pari per gli altri. Ci sono cose che sono facili per le persone ma difficili per i computer ma è molto difficile scriverne i codici. Invece un sistema più giusto sarebbe uno che è difficile per un computer da fare, ma non molto difficile da verificare. Si potrebbe quindi creare una hash challange dove lo sfidante deve generare hash di molti numeri finche, non ne trovano uno che è più basso di una data difficoltà.
Questo processo è stato proposto per la prima volta da Adam Back nel 1997 come hashcash ed è stato poi implementato in Bitcoin da Satoshi Nakamoto come proof of work nel 2008. Ethereum è stato lanciato usando questo sistema.
Con questo codice puoi creare il tuo token basato sul proof of work.
bytes32 public currentChallenge;                         // The coin starts with a challenge

uint public timeOfLastProof;                             // Variable to keep track of when rewards were given

uint public difficulty = 10**32;                         // Difficulty starts reasonably low


function proofOfWork(uint nonce){

bytes8 n = bytes8(sha3(nonce, currentChallenge));    // Generate a random hash based on input

require(n = bytes8(difficulty));                   // Check if it's under the difficulty


uint timeSinceLastProof = (now - timeOfLastProof);  // Calculate time since last reward was given

require(timeSinceLastProof =  5 seconds);         // Rewards cannot be given too quickly

balanceOf[msg.sender] += timeSinceLastProof / 60 seconds;  // The reward to the winner grows by the minute


difficulty = difficulty * 10 minutes / timeSinceLastProof + 1;  // Adjusts the difficulty


timeOfLastProof = now;                              // Reset the counter

currentChallenge = sha3(nonce, currentChallenge, block.blockhash(block.number - 1));  // Save a hash that will be used as the next proof

}
Inoltre cambia il constructor function e aggiungi questa linea:
timeOfLastProof = now;
Una volta che il contratto è online seleziona la funzione proof of work, aggiungi il tuo numero preferito nel campo nonce e prova ad avviarlo. Se la finestra di conferma ti da un avviso rosso che dice data can’t be execute, vai indietro e scegli un altro numero finche non trovi quello che permette alla transazione di continuare, questo processo è random. Se ne trovi uno sarai ricompensato con un token per ogni minuto che è passato dall’ultima ricompensa, e poi la difficolta salirà o si abbasserà con una media di 10 minuti per ricompensa.
Il processo di trovare il giusto numero e prendere una ricompensa è il mining. Se la difficoltà aumenta, può essere difficile trovare il numero, ma sarà sempre facile verificare che ne hai trovato uno.
Coin migliorato
Codice completo
Se hai aggiunto tutte le funzioni avanzate, avrai un codice simile a questo:
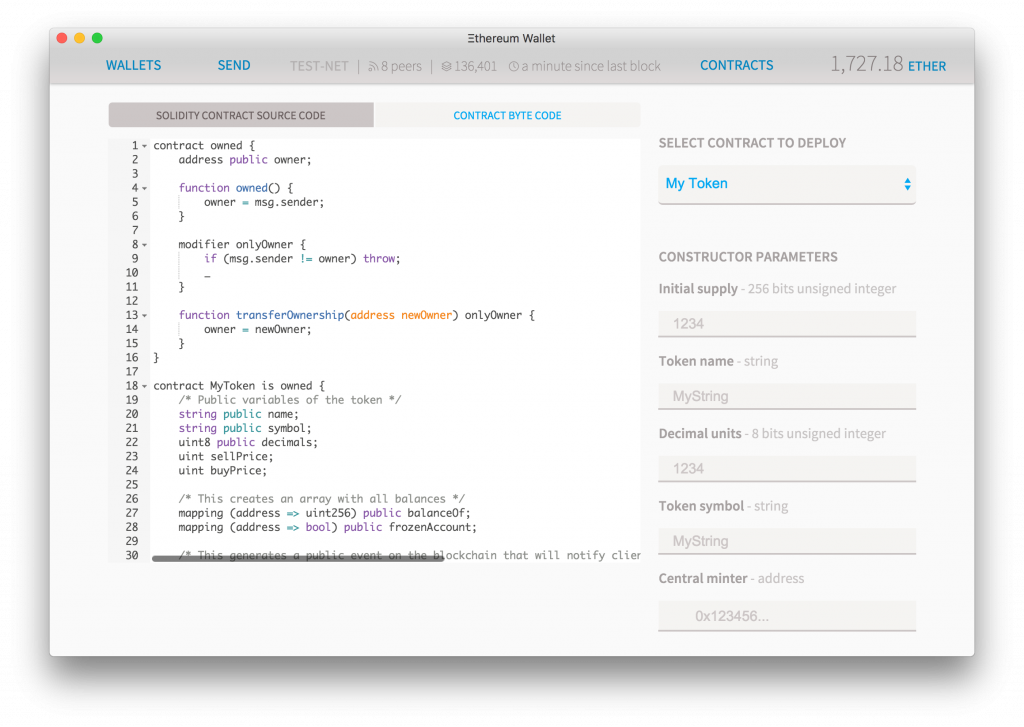
pragma solidity ^0.4.16;
contract owned {
address public owner;
function owned() public {
owner = msg.sender;
}
modifier onlyOwner {
require(msg.sender == owner);
_;
}
function transferOwnership(address newOwner) onlyOwner public {
owner = newOwner;
}
}
interface tokenRecipient { function receiveApproval(address _from, uint256 _value, address _token, bytes _extraData) public; }
contract TokenERC20 {
// Public variables of the token
string public name;
string public symbol;
uint8 public decimals = 18;
// 18 decimals is the strongly suggested default, avoid changing it
uint256 public totalSupply;
// This creates an array with all balances
mapping (address = uint256) public balanceOf;
mapping (address =mapping (address = uint256)) public allowance;
// This generates a public event on the blockchain that will notify clients
event Transfer(address indexed from, address indexed to, uint256 value);
// This notifies clients about the amount burnt
event Burn(address indexed from, uint256 value);
/**
* Constrctor function
*
* Initializes contract with initial supply tokens to the creator of the contract
*/
function TokenERC20(
uint256 initialSupply,
string tokenName,
string tokenSymbol
) public {
totalSupply = initialSupply * 10 ** uint256(decimals); // Update total supply with the decimal amount
balanceOf[msg.sender] = totalSupply; // Give the creator all initial tokens
name = tokenName; // Set the name for display purposes
symbol = tokenSymbol; // Set the symbol for display purposes
}
/**
* Internal transfer, only can be called by this contract
*/
function _transfer(address _from, address _to, uint _value) internal {
// Prevent transfer to 0x0 address. Use burn() instead
require(_to != 0x0);
// Check if the sender has enough
require(balanceOf[_from] = _value);
// Check for overflows
require(balanceOf[_to] + _value balanceOf[_to]);
// Save this for an assertion in the future
uint previousBalances = balanceOf[_from] + balanceOf[_to];
// Subtract from the sender
balanceOf[_from] -= _value;
// Add the same to the recipient
balanceOf[_to] += _value;
Transfer(_from, _to, _value);
// Asserts are used to use static analysis to find bugs in your code. They should never fail
assert(balanceOf[_from] + balanceOf[_to] == previousBalances);
}
/**
* Transfer tokens
*
* Send `_value` tokens to `_to` from your account
*
* @param _to The address of the recipient
* @param _value the amount to send
*/
function transfer(address _to, uint256 _value) public {
_transfer(msg.sender, _to, _value);
}
/**
* Transfer tokens from other address
*
* Send `_value` tokens to `_to` in behalf of `_from`
*
* @param _from The address of the sender
* @param _to The address of the recipient
* @param _value the amount to send
*/
function transferFrom(address _from, address _to, uint256 _value) public returns (bool success) {
require(_value = allowance[_from][msg.sender]); // Check allowance
allowance[_from][msg.sender] -= _value;
_transfer(_from, _to, _value);
return true;
}
/**
* Set allowance for other address
*
* Allows `_spender` to spend no more than `_value` tokens in your behalf
*
* @param _spender The address authorized to spend
* @param _value the max amount they can spend
*/
function approve(address _spender, uint256 _value) public
returns (bool success) {
allowance[msg.sender][_spender] = _value;
return true;
}
/**
* Set allowance for other address and notify
*
* Allows `_spender` to spend no more than `_value` tokens in your behalf, and then ping the contract about it
*
* @param _spender The address authorized to spend
* @param _value the max amount they can spend
* @param _extraData some extra information to send to the approved contract
*/
function approveAndCall(address _spender, uint256 _value, bytes _extraData)
public
returns (bool success) {
tokenRecipient spender = tokenRecipient(_spender);
if (approve(_spender, _value)) {
spender.receiveApproval(msg.sender, _value, this, _extraData);
return true;
}
}
/**
* Destroy tokens
*
* Remove `_value` tokens from the system irreversibly
*
* @param _value the amount of money to burn
*/
function burn(uint256 _value) public returns (bool success) {
require(balanceOf[msg.sender] = _value); // Check if the sender has enough
balanceOf[msg.sender] -= _value; // Subtract from the sender
totalSupply -= _value; // Updates totalSupply
Burn(msg.sender, _value);
return true;
}
/**
* Destroy tokens from other account
*
* Remove `_value` tokens from the system irreversibly on behalf of `_from`.
*
* @param _from the address of the sender
* @param _value the amount of money to burn
*/
function burnFrom(address _from, uint256 _value) public returns (bool success) {
require(balanceOf[_from] = _value); // Check if the targeted balance is enough
require(_value &lt;= allowance[_from][msg.sender]); // Check allowance
balanceOf[_from] -= _value; // Subtract from the targeted balance
allowance[_from][msg.sender] -= _value; // Subtract from the sender's allowance
totalSupply -= _value; // Update totalSupply
Burn(_from, _value);
return true;
}
}
/******************************************/
/* ADVANCED TOKEN STARTS HERE */
/******************************************/
contract MyAdvancedToken is owned, TokenERC20 {
uint256 public sellPrice;
uint256 public buyPrice;
mapping (address =&gt; bool) public frozenAccount;
/* This generates a public event on the blockchain that will notify clients */
event FrozenFunds(address target, bool frozen);
/* Initializes contract with initial supply tokens to the creator of the contract */
function MyAdvancedToken(
uint256 initialSupply,
string tokenName,
string tokenSymbol
) TokenERC20(initialSupply, tokenName, tokenSymbol) public {}
/* Internal transfer, only can be called by this contract */
function _transfer(address _from, address _to, uint _value) internal {
require (_to != 0x0); // Prevent transfer to 0x0 address. Use burn() instead
require (balanceOf[_from] = _value); // Check if the sender has enough
require (balanceOf[_to] + _value = balanceOf[_to]); // Check for overflows
require(!frozenAccount[_from]); // Check if sender is frozen
require(!frozenAccount[_to]); // Check if recipient is frozen
balanceOf[_from] -= _value; // Subtract from the sender
balanceOf[_to] += _value; // Add the same to the recipient
Transfer(_from, _to, _value);
}
/// @notice Create `mintedAmount` tokens and send it to `target`
/// @param target Address to receive the tokens
/// @param mintedAmount the amount of tokens it will receive
function mintToken(address target, uint256 mintedAmount) onlyOwner public {
balanceOf[target] += mintedAmount;
totalSupply += mintedAmount;
Transfer(0, this, mintedAmount);
Transfer(this, target, mintedAmount);
}
/// @notice `freeze? Prevent | Allow` `target` from sending &amp; receiving tokens
/// @param target Address to be frozen
/// @param freeze either to freeze it or not
function freezeAccount(address target, bool freeze) onlyOwner public {
frozenAccount[target] = freeze;
FrozenFunds(target, freeze);
}
/// @notice Allow users to buy tokens for `newBuyPrice` eth and sell tokens for `newSellPrice` eth
/// @param newSellPrice Price the users can sell to the contract
/// @param newBuyPrice Price users can buy from the contract
function setPrices(uint256 newSellPrice, uint256 newBuyPrice) onlyOwner public {
sellPrice = newSellPrice;
buyPrice = newBuyPrice;
}
/// @notice Buy tokens from contract by sending ether
function buy() payable public {
uint amount = msg.value / buyPrice; // calculates the amount
_transfer(this, msg.sender, amount); // makes the transfers
}
/// @notice Sell `amount` tokens to contract
/// @param amount amount of tokens to be sold
function sell(uint256 amount) public {
require(this.balance &gt;= amount * sellPrice); // checks if the contract has enough ether to buy
_transfer(msg.sender, this, amount); // makes the transfers
msg.sender.transfer(amount * sellPrice); // sends ether to the seller. It's important to do this last to avoid recursion attacks
}
}
Distribuzione
Scrolla e potrai vedere un costo stimato per la distribuzione. Se vuoi puoi cambiare lo slider per mettere una tassa più bassa. Clicca deploy e inserisci la tua password. Dopo qualche secondo verrai ridirezionato alla dashboard e sotto latest transaction vedrai la scritta creating contract. Aspetta qualche secondo e vedrai un triangolo blu che rappresenta quanti nodi hanno visto la tua transazione e l’hanno confermata, più conferme hai, più sei sicuro che il tuo codice sia stato distribuito.

Clicca sul link che dice admin page e verrai portato ad un’altra dashboard dove puoi fare quel che vuoi con la tua nuova valuta.
A sinistra sotto read from contract hai le opzioni e le funzioni che puoi usare per leggere le informazioni dal contratto gratuitamente. Se il tuo token ha un possessore, l’indirizzo verrà mostrato qui. Copia quell’indirizzo e incollalo in balance of e ti mostrerà il bilancio di qualsiasi account.
A destra sotto write to contract vedrai tutte le funzioni che puoi usare per alterare o cambiare la blockchain. Se hai creato un contratto che ti permette di creare nuovi token, puoi vedere una funzione che si chiama mint token, selezionala.
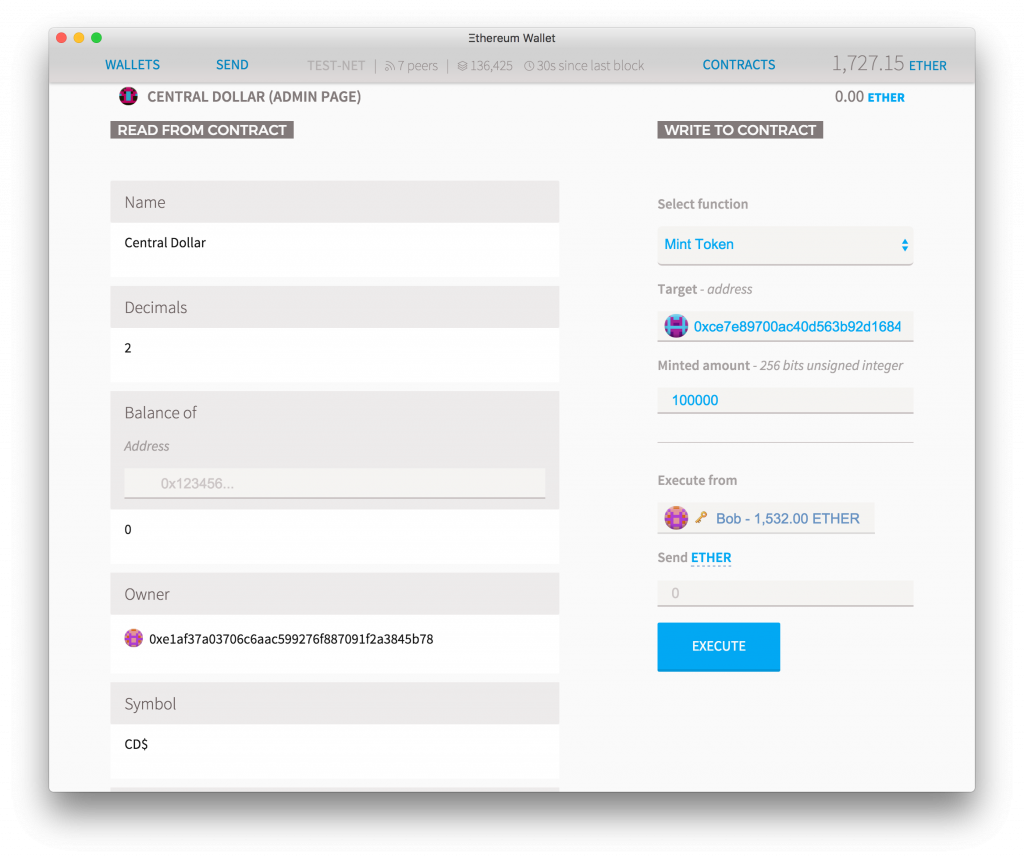
Seleziona l’indirizzo dove queste nuove valute verranno create e poi la quantità (se hai i decimali impostati a 2, allora aggiungi 2 zero dopo la quantità, per creare la quantità corretta). Su execute from seleziona l’account possessore, lascia la quantità di ether a 0 e premi execute.
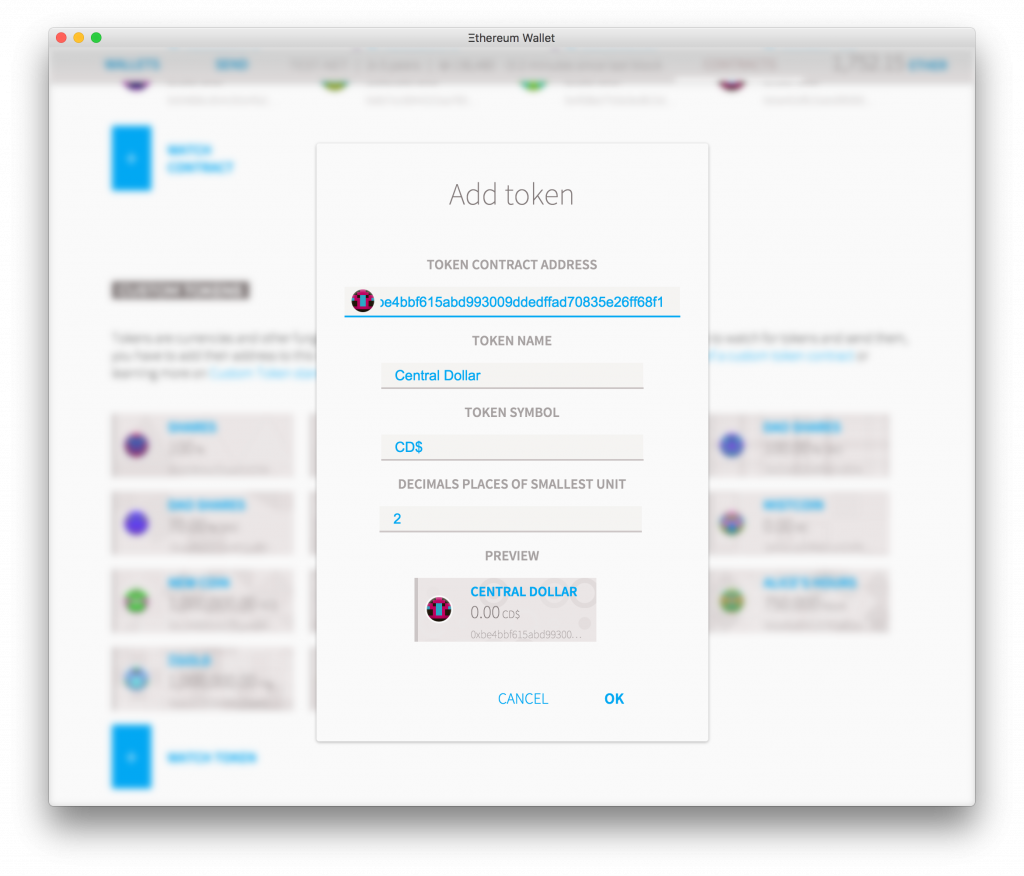
Usare il tuo token
Una volta distribuiti i token, verranno aggiunti nella tua lista di watched tokens, e il bilancio totale verra mostrato sul tuo account. Per inviare token vai su send e seleziona un account che contenga token e poi la quantità di token da inviare.
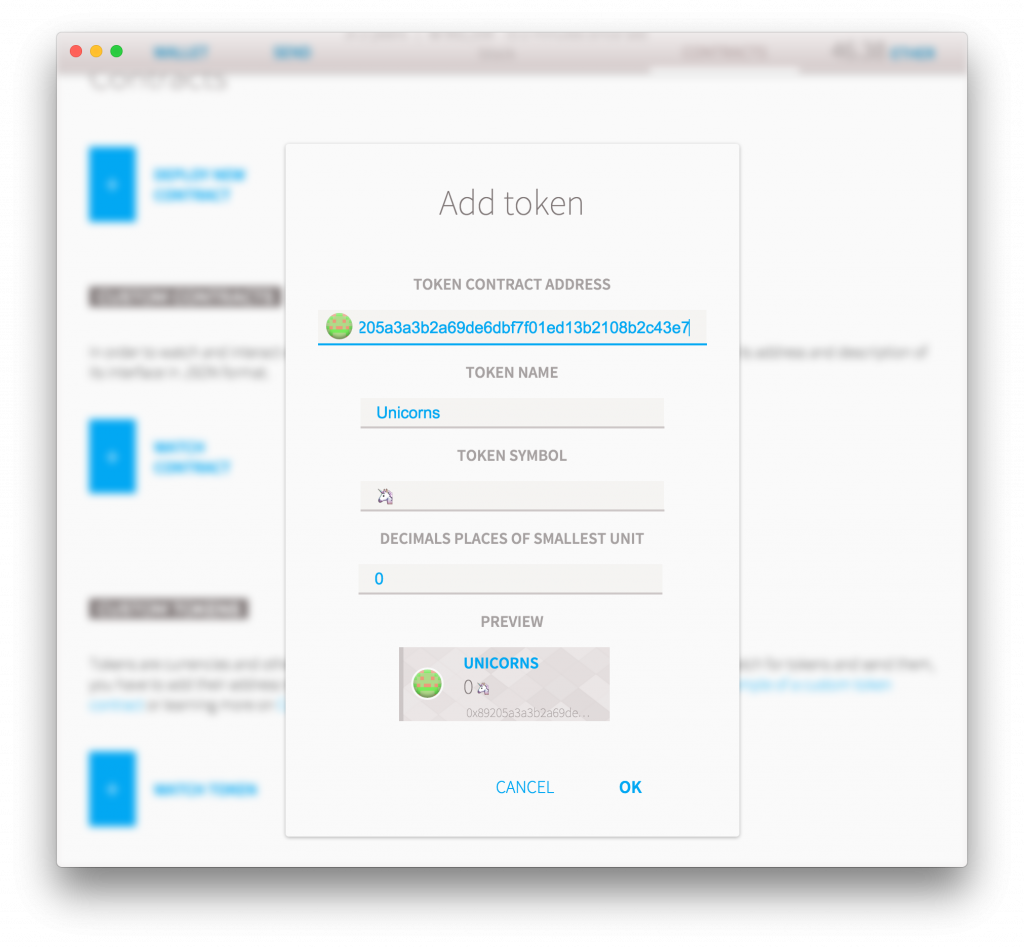
Se vuoi aggiungere i token di qualcun’altro, vai su contracts e clicca watch token. Aggiungi l’indirizzo del wallet e verranno caricate le altre informazioni. Poi potrai cliccare ok e il token verrà aggiunto.
Adesso hai imparato come puoi usare ethereum per emettere un token, possono rappresentare qualsiasi cosa. Ma cosa puoi farci? Ad esempio possono rappresentare un’azione di una compagia o puoi anche usarli per fare soldi per una causa, con crowdsale.
